Last year, around this time, Marc and I agreed we should write a blog series on our development process. As often happens good intentions get buried in other commitments, but I’ve finally managed to circle back on this topic which I’m finding has become more important than ever. Over the last year the SharePoint Framework has taken off. Although it still doesn’t support the paradigm that I most often am developing for - the full-page app hosted in SharePoint - I still think it’s a great model for development. At this point Modern has come far enough in its parity with Classic that Marc and I are recommending to our clients on or going to Office 365 to go Modern first, and then fall back if you’re impeded. That said, we know from our client conversations that a significant number of organizations are still using legacy versions of SharePoint, some all the way back to the 2007 version. There is absolutely nothing wrong with that if it’s working for your organization, but I suspect some people are feeling a little left out in the cold with regard to how they fit into the conversation when SharePoint Framework is at this time only for SharePoint online or for SharePoint 2016 with Feature Pack 1. Further, I suspect many on these older versions envision a time in the not too distant future where they will be migrating to either a newer/newest version of the on premises product or to Office 365. The point that I’m going to make in this series is that even if you’re not using the SharePoint Framework you can create your own process that mimics the toolchain and propels your development from a bit of a hack into a more formalized process. Not only does this help your organization; it helps you become more marketable in today’s SharePoint development environment.
Formalize for more foolproof administration
Formalizing the toolchain is really all about bringing legitimacy to the client-side software development lifecycle (SDLC). Once you get in the groove of using one it adds very little overhead to your development but does formalize it in a way that makes it easier to document, update, backup, deploy, and maintain. Who doesn’t want that?
Understand the key aspects
There are so many aspects to an SDLC; development environment, authoring, testing, deployment, documentation, change management, maintenance. I will focus on a few key aspects of the development environment, authoring, deployment, and change management. The point of sharing what we do here at Sympraxis is to give you food for thought to build your own system that works for you and your organization.
Pick your own adventure
My current plan (which may change) will be to add the following posts to this series, “Deploying code”, “Bundling Code”, “Adding Typescript, SCSS, and beyond”. Each one of them will introduce a piece of our current process which you can choose to use or bypass depending on your needs. But before we even go there I need to introduce the toolchain and get you started. I’m not going to dig too deep into the step by step process of setting up your development environment because there is a fantastic free resource available which does this better than I could do in a blog post. (Navigate to Voitanos’ site, go to the “Store”, click “Learn More” for the Mastering the SharePoint Framework course and then scroll down and sign up for the Free Starter Bundle.)
Set up your Development Environment
By now most of you have seen the toolchain comparison chart:
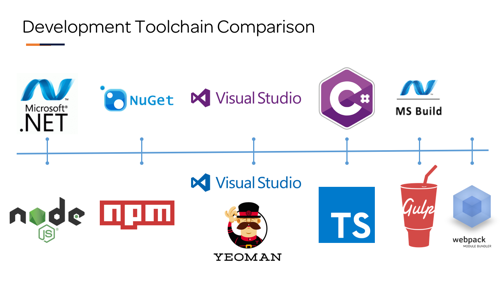
Image by Voitanos’
To start off you need to install NodeJS for the toolchain. It’s basically a runtime version of Chrome’s JavaScript engine which allows you to run JavaScript-based code the same way you’d execute a C# console application and that’s why the image above depicts it as the equivalent of the .NET framework.
One of the mistakes I made when I first started working with this toolchain was that I only installed NodeJS. Let me be clear: this is one of those places where it depends. I’m a consultant, I do a lot of different projects for a lot of different people and not all of them are even on SharePoint, let alone the SharePoint Framework. I benefit significantly from using a tool called the Node Version Manager (NVM). In the Voitanos’ resource I point you to above, Andrew Connell explains in detail how to install NVM depending on if you’re on a Mac or a PC.
What NVM allows me to do is easily switch between different versions of NodeJS. It’s like when you create a Visual Studio project and you pick which version of the .NET framework you want to target. The SharePoint Framework requires you to target a specific version of NodeJS, and you may want to play around and do things with other versions of NodeJS. By using NVM this becomes simple as does testing the upgrade when you want to move your work to a newer version of NodeJS. You can always go back and add it later, but it’s obviously going to be a bit of a pain, so I suggest you do the installation up front.
After you get NodeJS (and NVM if you’re using it) installed then what? NodeJS goes hand in hand with NPM or Node Package Manager (functionality) and is basically a command line version of NuGet package manager which we’re used to using in Visual Studio. NPM is installed when you install NodeJS, however, you will probably want to update it which you do by referencing itself, in other words tell NPM to update NPM. NPM is coordinated for a project by the package.json file which tells NPM which packages you need for the runtime and which packages you need for development.
There are basically three “locations” for NPM packages to be installed. Globally (-g), Dependencies, devDependencies. For the most part, when doing SharePoint work, I only use NPM for dev dependencies and use a CDN to reference any runtime dependencies. For typescript my dev dependencies would also include the typings for any of the runtime libraries I’ll be using - more on that later. Because I do SharePoint Framework development as well I have two things installed globally, one is “yo” which is the Yeoman Generator. From our graphic you can see it’s mapped to the Visual Studio block because yo provides the same functionality as Visual Studio project templates. It’s just a way for you to start your project with much of the scaffolding already in place. This is what the SharePoint Framework uses to get your started, so in addition to yo I also have the @microsoft/generator-sharepoint@1.3.4 package which is the yeoman template for a SharePoint Framework project.
Back to NVM, each version of NodeJS has its own “global” NPM package area. In the version of NodeJS that supports the SharePoint Framework (at the time of this post v6.x) I’ve installed yo globally. Since I don’t really use it for some of my other development projects in the more recent version of NodeJS I have installed (at the time of this post v8.9.4) I didn’t bother installing yo. Long story short, if you’re not doing SharePoint Framework development you really don’t need to install anything globally.
At this point you’re ready to start coding, and for that you can use whatever editor (or IDE) you feel most comfortable with. A popular choice (and free) is Visual Studio Code. It works well and is constantly being updated and maintained. I use it for all my demo work as well as some production coding. Marc and I both like WebStorm from JetBrains. I tried it because I got it free as a benefit of my Microsoft MVP, and I stayed with it because I like the IDE aspects of it. Visual Studio is an obvious choice, but I find it a little cumbersome with its folder-based project structure, and you’ll have to run a command line terminal separately where both Visual Studio Code and WebStorm have them built in. The are many, many other editors and IDE’s out there, so use the one that works best for you.
At this point, for everything else I install, I do so at the project level. The first NPM package I would add to your development dependencies is Gulp. Gulp is a task runner and is the equivalent of the MSBuild runtime that is used when you’re in Visual Studio and compiling code. Another mistake I made early on was to install gulp globally, which came back to bite me as I found that over time updated packages I was using ended up conflicting with the older version of gulp I had installed globally. Again, because I’m a consultant and work on many different projects in many, many different environments this is more critical to me. I need to be sure that I can go back to an older project and just have it work without having to wrangle with the versions of the various packages I have in my environment. You can make your own choices depending on the type of work you’re going to be doing.
I hope this has been a helpful introduction to getting started with a more formalized client-side toolchain and dev environment that accompanies it. The next post in this series will go into what the basic package.json and gulpfile.js files look like in my basic SharePoint development scenario which supports automatic deployment to a SharePoint library.