The requirement seemed deceptively simple… and it was, somewhat… simple. I’ll start with showing you how very simple it is to launch a Microsoft Flow (“flow”) from your client-side code hosted, well… wherever. I will give you this caveat, launching a flow this way requires no authentication. The URL is entirely obscure, but if you’re concerned that the flow you’re starting does something you only want to allow authenticated users in your organization to do then you may want to rethink this. As with all security issue you need to assess and balance security with risk. I suppose that’s true of life too.
Creating a Microsoft Flow that can be launched from the client
One of the most common uses of workflow, at least for me with my clients, is to send email notifications. Microsoft Flow is excellent at this, with the caveat that the email cannot be sent on behalf of the user running the workflow unless the user you use to create the send email step under in the flow can send email on behalf of the user running the workflow. That is to say, there isn’t a way to send email from the authenticated user with the Outlook connector without the appropriate permissions.
Ok, so let’s say you’d like to send an email notification from your client-side application running in SharePoint. The idea is that you would want to hand over to flow the information about how to compose the email and then it would do the rest. As my 5-year-old likes to say, easy peasy lemon squeezy. There’s even a walk-through of doing just this from Irina Gorbach on the Microsoft Flow Blog Calling Microsoft Flow from your application (Post no longer available)
To add to that post just a bit, the Request connector has a section for advanced parameters. The “Method” by default is a “POST”, you can certainly specify this strictly if you want. If you’re not passing parameters in your scenario and only want to use a GET, you’d have that option. Also, depending on your application there is a second parameter called “Relative path”. That’s used to specify your parameter on the path and use the “GET” method, this could be used for advanced routing in SPA applications. A more in-depth post in the Azure Logic Apps documentation can help you understand this scenario better Call, trigger, or nest workflows with HTTP endpoints in logic apps
Also, you may want to consider adding a “Response” action, also outlined in the afore mentioned Azure Logic Apps documentation, to your flow as the Azure post indicates to tell your client-side code what happened. If you don’t it will return a status 202 - Accepted by default. Just to reiterate, once you have the flow done, you simply add an ajax/$http/{your favorite implementation of XMLHttpRequest} request to your client-side code, like you would to make any other REST call. Unlike with SharePoint calls though you will not need to add tokens to the header to make a POST call. Using AngularJS $http provider, the call would look like:
var item = {
   emailSubject: “My SharePoint and Flow Email”,
   emailBody: “My SharePoint and Flow Body”
}

$http({
   method: 'POST',
   headers: {
      "Content-Type": "application/json",
   },
   data: JSON.stringify(item),
   url: "https://prod-48.westus.logic.azure.com:443/workflows/417b791699a24bb99d70a29b91ad7998/triggers/manual/paths/invoke?api-version=2016-06-01&sp=%2Ftriggers%2Fmanual%2Frun&sv=1.0&sig=jp1VuAlYMgvSx999Z5lGhEm99PxSb6dkB75ZALct3b0"
})
User Context for Microsoft Flow – The new elevated privileges
To keep with my lemon theme what might be considered lemons, in that you cannot execute actions as the user from a flow, we shall turn to lemonade, in that flow provides us developers with the perfect vehicle to execute work with elevated privileges. Given how much we can do through client-side code, all as the currently authenticated user, I’m personally quite happy with making this trade, especially with the addition of launching Azure functions as part of my flow. In my next scenario let’s discuss the idea of adding a Help Desk Request widget to the home page of every site collection in SharePoint. This reusable bit of code would be an excellent candidate for an SPFx web part but to keep the complexity level down I’m going to discuss it from the perspective of creating a basic client-side web part using the standard methods I often discuss which is to say using a SEWP/CEWP to put a bit of HTML/CSS/JavaScript on the page. The solution will basically be a form with a button that allows the user to enter the issue and submit it to a Help Desk list in another site collection that is secured to those that run the help desk.
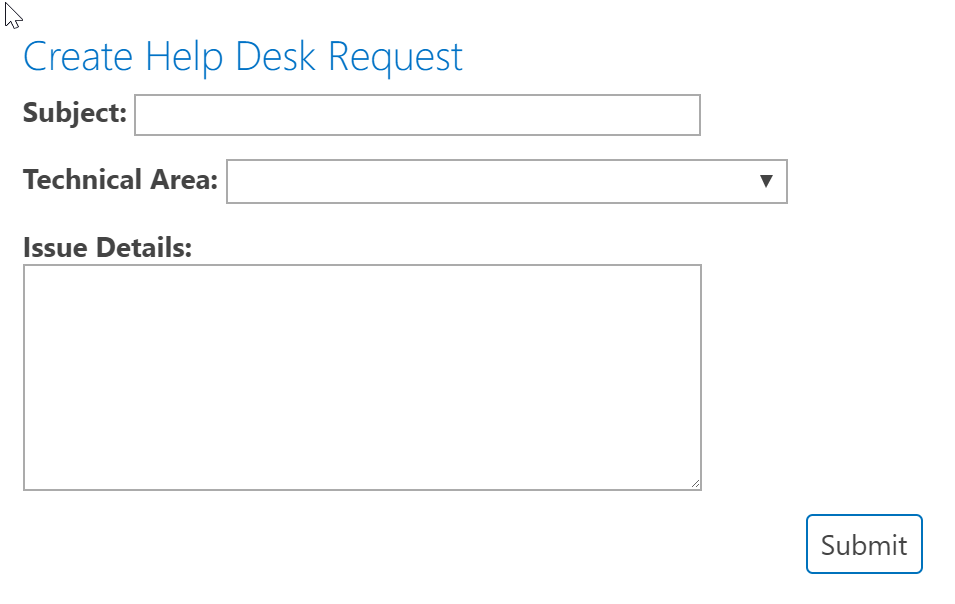
When the user clicks submit what we’d like to do is launch a flow that will insert an item into the Help Desk Request list, where the user that is submitting the issue doesn’t even have read rights. To do this I’ve decided to create another O365 user called “Help Desk" that will act on the behalf of the help desk. That user has been given contribute rights to the Help Desk Request list. Yes, I’m absolutely aware that taking this action will require another monthly fee for that user, and I have to say I really wish there was a “service” account level user that we could add that could access an email box and get access to SharePoint, etc, etc, that would either be free or available at a significantly discounted monthly rate… sadly there is not. Note: Although there is the concept of an unlicensed user that is a service account per say, the level of privileges that user would then have is way too high. Further, flow will not recognize it as a valid connection.
You could also do this with any other user that has access to the Help Desk Request list. However, please keep in mind that if that user ever leaves or their account is removed/deactivated for whatever reason your flow will stop working. At the very least you will want to make sure you share your flow with one or more other users so that if something happens there will be at least one other person with rights to the flow that can change the context of the actions.
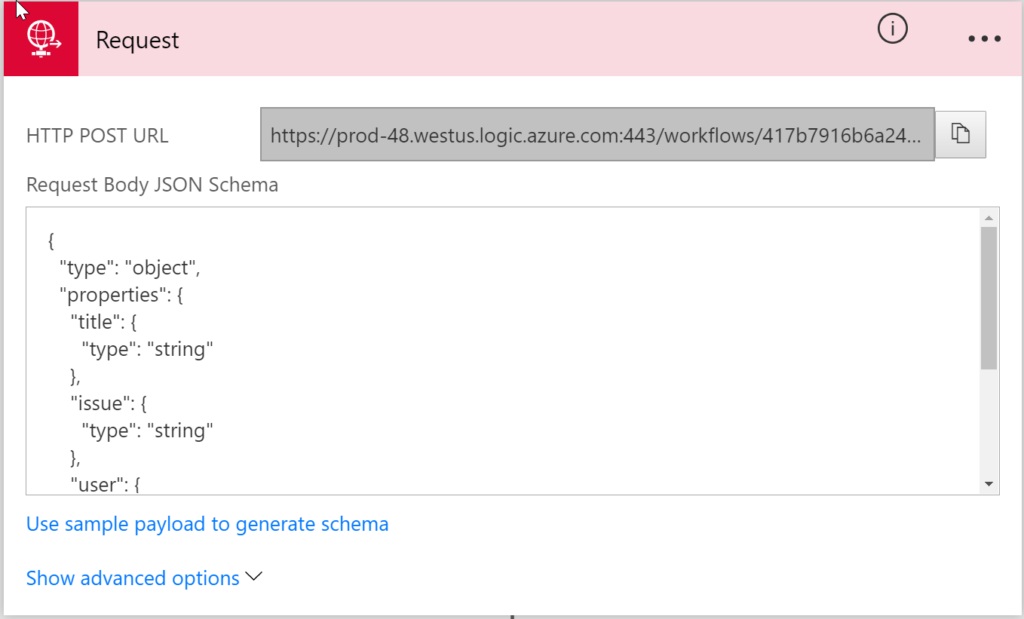
First is the request trigger connection. I set this up with the following JSON payload where user is the user’s login name.
{
   "title": "string",
   "issue": "string",
   "user": "string",
   "technicalarea": "string"
}
Next I added the SharePoint “Create item” action and set the values of the item with variables from my request trigger body. Note that I’ve made sure the action is running under the helpdesk@sympraxisconsulting.com user. This way the user will have permissions to add the item to the list.
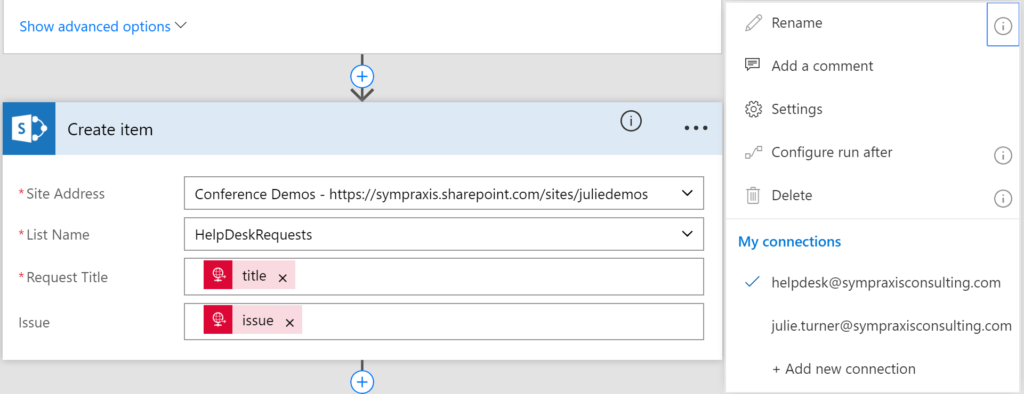
If you’re looking at the above images and wondering wait, there are more fields in my form/JSON payload than in my flow “Create item” step… your eyes are not deceiving you. Read on…
Wait!? WHAT! Microsoft Flow can’t do that???? –Azure Functions to the rescue
This section is dedicated to my biggest pet peeve (at the moment) which is what I would consider basic missing features of Microsoft Flow SharePoint connectors. The fact that it lacks support for all basic list and library field types (i.e. Person, choice, manage metadata/taxonomy, etc), makes it somewhat less than a “mvp” (minimally viable product) but, well, who am I right. So, in lieu of a working product I’ll just share the work around. My griping aside, this section will hopefully become more and more obsolete with every passing month so I suppose that’s at least something.
My good friend Bob German (partially due to my relentless prodding) just posted an excellent series on creating Azure Functions that “talk” to SharePoint. You can read them here Calling SharePoint CSOM from Azure Functions. I used this method to write a customized Azure Function that would update my SharePoint list item created in the flow with the remaining information that could not be updated by the flow. I’m certainly not going to rehash what he expertly explained but I will share a tidbit that Bob also tracked down and why this post has been delayed a couple weeks and that is the API key for adding a custom connection to your Azure Function from flow.
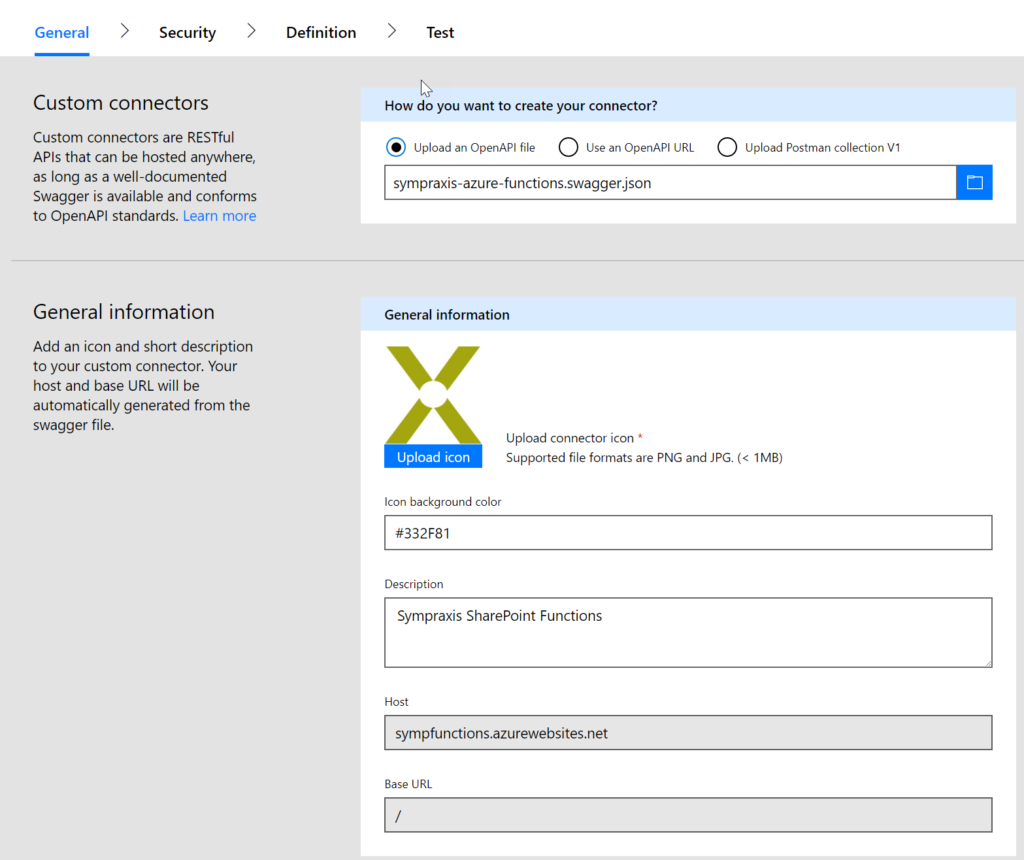
To create the connection you need a swagger file/URL which you can get by going to your azure function and checking out the API Definition tab (in preview as of this post). I had tried to use the “Export to PowerApps and Flow” tool there but couldn’t get it to work, not that it won’t be working by the time you read this. Also, as of this post you’re going to need to do a little tweaking to the “Definition” section, for some reason it doesn’t really get what it needs from the swagger. Here’s what it looked like for me, your mileage may vary.
In all my efforts trying to get this to work properly at some point switched from pointing at the API Definition URL to trying to build my own swagger file, in hindsight I think the URL worked just fine.
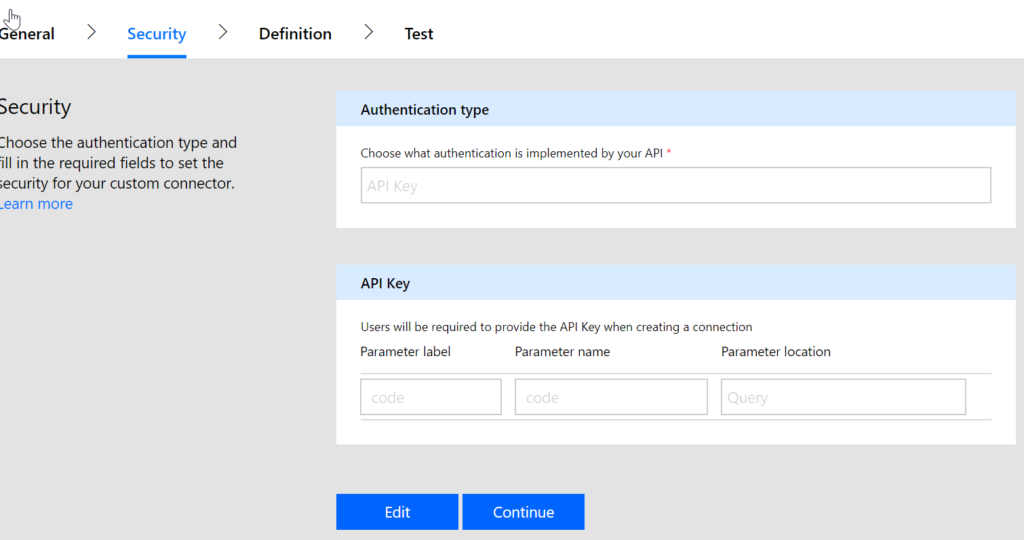
More kudos to Bob on helping me through the security part. He figured out that the API key parameter label needs to be “code”.

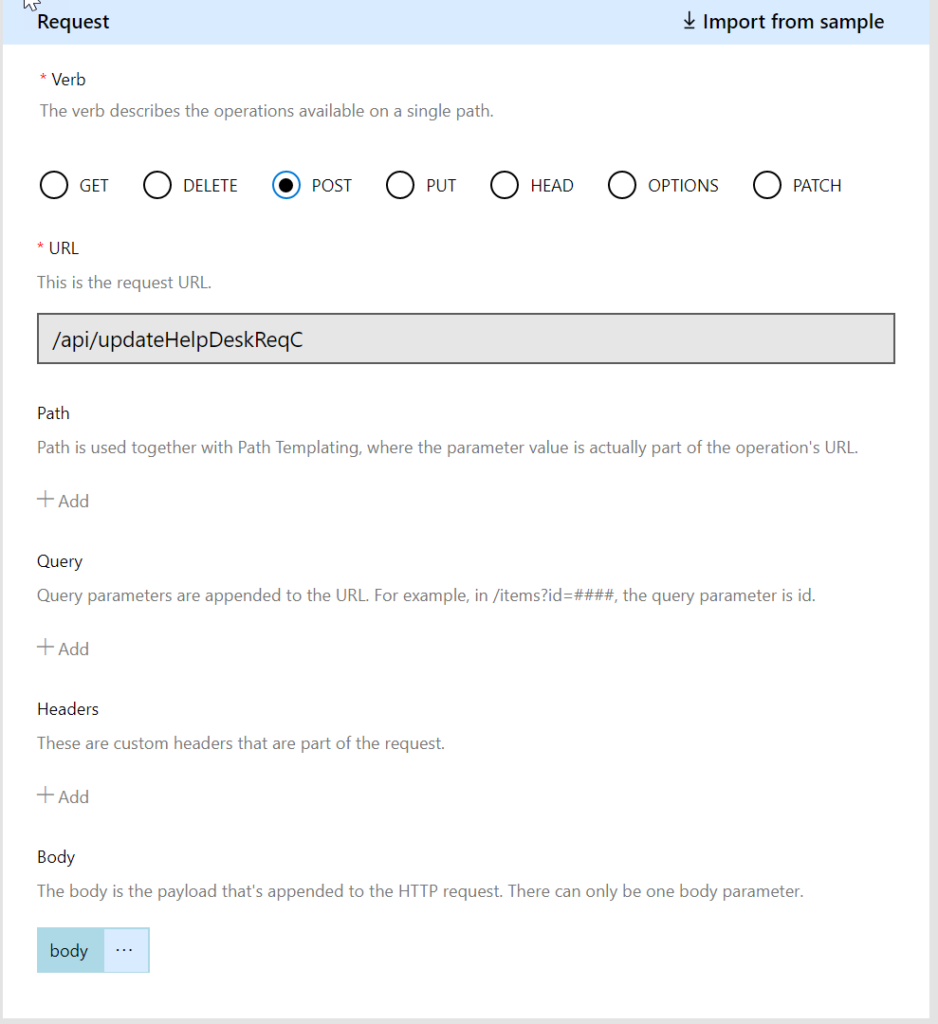
And again, during Bob’s talk “Going with the Flow: Rationalizing the Workflow Options in SharePoint Online” he explained that to get the flow connector to understand my payload I needed to “Import from sample” which gives you a little flyout where you can specify how your REST call needs to look. Since I’m using the Body and not query string parameters my Request section is now all set for me.
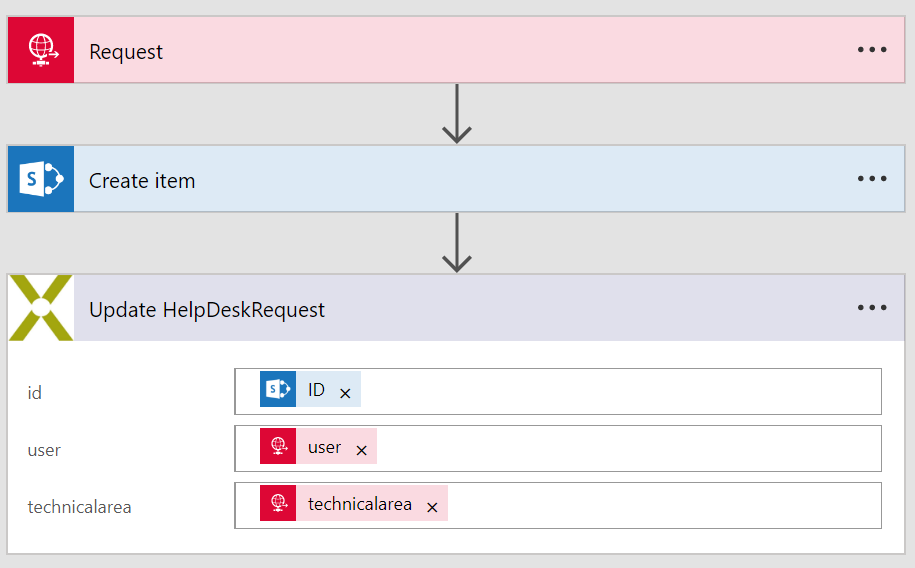
Finally, my completed flow which I call exactly like the other simpler flow from the beginning of this post.
Hopefully a few of these scenarios will help you think through how you might make Microsoft Flow part of your SharePoint online solutions. Happy Coding!